Working with Browse Tables
The results of searches are usually displayed in tables, known as browse tables. You can manipulate the contents of a browse table by filtering and sorting it, as well as copying or exporting it to a file outside vFire Core.
Standard Buttons on a Browse Table
The buttons on the toolbar of a browse table may vary depending on the nature of the information it contains. The following buttons are commonly found.

|
View the currently selected item. Depending on your permissions, this may 'take action' on the item and change the ownership to you, or it will open the item in review mode and leave ownership with the current owner. To select multiple results, hold down the Ctrl key and click each of the items in turn. Or hold down Shift to select a range. |

|
View the selected item in review mode |

|
Update the search results |

|
Customize the appearance of the table |

|
Open a printable view of the results |

|
Delete a record |

|
Clone the details of a record into a new record |

|
View a report of the record |

|
Open a CMDB linking diagram if the selected entry is a CMDB item, or open the organization linking diagram if the item is an organization |

|
Display the details in a table (displayed if you are viewing results in chart view) |

|
Save the search |

|
View as a graph (displayed if you are viewing results in table view) |

|
Copy the results |

|
Configure your settings |
Changing the Width of a Column
You can change the width of columns on any browse table in vFire Core. Simply place the cursor on one of its side borders in the title bar, then select and drag to the desired width.
Sorting Columns
To change the order in which information is displayed on a browse table (for example, sort by Call Number), select the column title by which you want to sort. When you click on the column title, the system will automatically refresh the window, displaying the results in the appropriate order.
Filtering Items
You can filter the items in any browse table to narrow down the number of items displayed based on the value of a single or a combination of multiple fields. For example, if you are viewing all the Calls Outstanding for an Analyst, but you are only interested in viewing calls where the Type is Hardware, you can filter based on this field value.
- Locate the field(s) on the browse table that you want to use for filtering. These are the column titles. An arrow is displayed next to the title / field name.
- Select the arrow to display the list of values for that field that are currently being displayed.
- Select the required value. The browse table will be refreshed to display only those items that match the filter you have set. The arrow is displayed in orange to indicate there is a filter in use.
- Repeat to filter on additional fields.
- To remove the filtering and revert to the original view, use the arrow on the fields to select the value (All).
Filters are lost when you close the window.
Selecting which Columns to Display
You can select which columns you want to display on any browse table and assign colors to specific record types.
- Display the browse table.
- Select the button on the local toolbar. The Select Columns window is displayed.
- Complete the details.
- Select OK to save the changes and return to the browse table.
| View Columns For | Select the entity type, such as Requests, Calls, etc. This will update the Filter by Screen Set field and the Available Columns list. On some windows, this option is grayed out, for example on the Call Search window, Calls is the only option. |
| Filter by Screen Set | Select the screen sets for the item chosen in View Columns For. You can use the multi-tier selector button  to select the screen set on which you want to filter. to select the screen set on which you want to filter. |
| Available Columns | A list of all available columns, based on the information selected in the previous two fields. Fields with an arrow to their right are sets of fields. You can select the entire set, or individual fields within it. |
| Selected Columns | The columns that are currently included in the browse table. Use the Add and Remove buttons to select the fields you want, and the Move Up and Move Down buttons to change the order in which they are displayed. This will only affect your display. Other analysts are unaffected. |
To ensure your settings are saved, log out and in again. If you have more than one Calls Outstanding window open, ensure that the one with your final desired changes is the only one open when logging out.
Selecting from Sets of Columns
Some items in the Available Columns are actually sets of columns, as indicated by an arrow to their right  .
.
Double click on the item to display its contents. The Available Columns pane will now have the name of the set at the top. 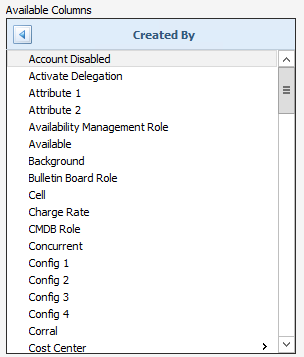
You can now select individual columns, or return to the previous pane by selecting the arrow in the title bar at the top of the list  .
.
If you double click on an item in the Selected Columns list, this column is removed from the list of available columns and you will need to reselect it from the Available Columns list if necessary.
Choosing Background and Text Colors
You can color code the records in call, task and request search results and most outstanding browse tables.
This will only affect your settings. Other analysts will be unaffected.
- Display the browse table.
- Select the
 button from the local toolbar.
 - The Select Colors window is displayed, and you can color code the records in your browse table.
- Use Restore Defaults to return your settings to the default.
- Select OK to save the settings. Only the text and color settings on the selected Color By category are saved. All other categories are stored to default once the window closes.
| Color By | Use the drop down list to select the criteria you want to color code by. This list only contains list-based columns from the columns you have selected for your results. To color by an additional column, please add that column to your results. Not all columns can be used to color by. |
|
Values |
The items listed here will depend on the browse table you have open and the value selected in the Color By field. Select the one you want to color code. You can also specify that you want the text to be bold by ticking the Bold box to its left. |
| Text Color | Use the drop down box to select the color of the text for the item currently selected in the Values list. |
| Text Background | Use the drop down box to select the color of the background for the item currently selected in the Values list. |
Restoring defaults only applies to the selected Color By category. To restore all other categories, close the window and reopen it or select Restore Defaults for each category within the Color By drop down menu.
Selecting the Contents of a Browse Table
You can select the contents of any browse table.
- Display the browse table.
- To select the whole table right-click anywhere in the table and choose Select All from the drop down menu. Or use Ctrl+A.
- To select multiple rows that are sequential use Shift
- To select individual rows that are not sequential use Ctrl
Exporting Search Results to a File
You can export the contents of any browse table to a file.
- Display the browse table.
- Select the rows you want to export.
- Right-click anywhere in the table and choose Export from the drop down menu.
- You can then choose to export the contents of the browse table to an XML file, a text file, or an Excel file.
If you are exporting to Microsoft Office Excel 2007, the resulting file will be saved with the extension <file name>.XLSX.
Copying a Cell or Row to the clipboard
You can copy one cell or row of the browse table to the clipboard, for use in other applications outside vFire Core.
- Display the browse table.
- Right-click anywhere in the table and chooseCopy Cell to Clipboard or Copy Row to Clipboard from the drop down menu.