According to ITIL, a call can be logged as an Incident, Problem, Major Incident, Known Error or Service Request, collectively referred to as ‘IPK’ in vFire Core. The IPK Statuses window enables you to add new IPK statuses and manage existing ones.
A call is generally logged as an Incident (that is, a minor incident). Major Incidents are linked to Incidents, where workaround information is available.
If a number of similar Incidents are logged relating to an issue, one of those Incidents can be promoted to, or can initiate, a Problem. A Major Incident can also be promoted to a Problem.
When the source of the reported issue is diagnosed, Problems can be promoted to, or can initiate, Known Errors.
Users can log a request for service (Service Request) if they want any additional service provided.
The default IPK statuses can be renamed, re-ordered in the list, and assigned a different abbreviation. You can create new IPK statuses, but cannot delete the default statuses: Incident, Problem, Known Error, Major Incident, and Service Request.
Creating an IPK Status
Before you start
As some parameters are read from the database at application start-up, we recommend that there are no Analysts logged on when you make changes to system settings.
You must have IPK Setup selected in the Admin tab of your General Access Security Role.
Ensure you are in the correct partition before applying the settings.
Enable IPK Statuses and Streams must be selected in the IPK Settings window.
-
Select the Menu button
 , then Admin, and then select System Administration. The System Administration window is displayed, with a menu of options available
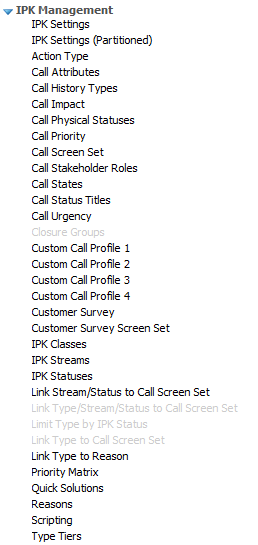
  . In the Explorer pane, locate the IPK Management group
  , scrolling up or down if necessary. You may need to expand the group to see the options.
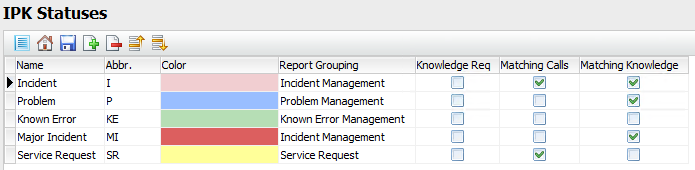
 - Select IPK Statuses to open the window. The statuses are displayed, along with their details
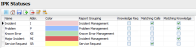 (You may like to adjust the column widths to see all of the columns.)

- Select
 . A new row is inserted in the IPK Status table.
 - Complete the details.
- Use the
 and
and  buttons to arrange the list in the order in which you want it to appear in drop-down lists.
 - Select
 to save the changes. Provide the Change Reasons if prompted to do so.
| Name | The name you want to use for the status |
| Abbr. | A one- or two-character identifier for the IPK status |
| Color | Using the drop down box, select a color you want to associate with the IPK status. This color is displayed on the Call Linking Diagram. |
| Report Grouping | The IPK classes that will be used for reporting on the current IPK Status. To change the reporting group, select a new value from the drop down list. The names of the available classes can be changed in the IPK Classes window. |
| Knowledge Req | Select to create a knowledge entry every time a call with the current IPK Status is closed. |
| Matching Calls | Select to display Calls in the Matching Panel of calls with this IPK Status |
| Matching Knowledge | Select to display Knowledge in the Matching Panel of calls with this IPK Status |
Updating an IPK Status
Before you start
As some parameters are read from the database at application start-up, we recommend that there are no Analysts logged on when you make changes to system settings.
You must have IPK Setup selected in the Admin tab of your General Access Security Role.
Ensure you are in the correct partition before applying the settings.
Enable IPK Statuses and Streams must be selected in the IPK Settings window.
-
Select the Menu button
, then Admin, and then select System Administration. The System Administration window is displayed, with a menu of options available . In the Explorer pane, locate the IPK Management group , scrolling up or down if necessary. You may need to expand the group to see the options. - Select IPK Statuses to open the window. The statuses are displayed, along with their details (You may like to adjust the column widths to see all of the columns.)
- Rename an existing status by typing over its name and abbreviation.
- To change the color assigned to an IPK status, select the drop-down and select a different color.
- Select to save the changes. Provide the Change Reasons if prompted to do so.
Changing the Order of IPK Statuses
Before you start
As some parameters are read from the database at application start-up, we recommend that there are no Analysts logged on when you make changes to system settings.
You must have IPK Setup selected in the Admin tab of your General Access Security Role.
Ensure you are in the correct partition before applying the settings.
Enable IPK Statuses and Streams must be selected in the IPK Settings window.
-
Select the Menu button
, then Admin, and then select System Administration. The System Administration window is displayed, with a menu of options available . In the Explorer pane, locate the IPK Management group , scrolling up or down if necessary. You may need to expand the group to see the options. - Select IPK Statuses to open the window. The statuses are displayed, along with their details (You may like to adjust the column widths to see all of the columns.)
- Select an IPK status in the browse table.
- Select or to change its order in the table. This is the order in which the statuses will be displayed on the Call button when an analyst logs a call.
- Select to save the changes. Provide the Change Reasons if prompted to do so.
Deleting an IPK Status
Before you start
As some parameters are read from the database at application start-up, we recommend that there are no Analysts logged on when you make changes to system settings.
You cannot delete system-defined IPK statuses, you can only delete ones that have been created after install.
You must have IPK Setup selected in the Admin tab of your General Access Security Role.
Ensure you are in the correct partition before applying the settings.
Enable IPK Statuses and Streams must be selected in the IPK Settings window.
-
Select the Menu button
, then Admin, and then select System Administration. The System Administration window is displayed, with a menu of options available . In the Explorer pane, locate the IPK Management group , scrolling up or down if necessary. You may need to expand the group to see the options. - Select IPK Statuses to open the window. The statuses are displayed, along with their details (You may like to adjust the column widths to see all of the columns.)
- Select the IPK status you want to delete by selecting in the relevant row.
- Select
 . If you attempt to delete the system default, you will receive a warning message.
 - Select to save the changes. Provide the Change Reasons if prompted to do so.