Sending an Email
You can send emails to inform and update Users and other analysts of developments and issues of interest from within vFire Core. These can include:
- Automated emails, which are set up to go to selected recipients if, say, there is an SLA breach
- Emails sent out as part of a call, request, bulletin board entry and a number of other functions within vFire Core
- Emails sent using the Message option within the menu
You can only send emails to people, groups or organizations who have valid email and pager addresses configured. If you have outgoing email addresses partitioned, the Sender email address that will be used will be the one assigned to the partition of the entity. Otherwise, the default email address will be used. All outgoing email IDs are specified in Email Settings. Partitioning of outgoing email IDs is enabled by selecting Outgoing Email ID on the Partition Settings window.
Whether you select to send the email from within another task, or by using the Message option from within the menu, the same window is displayed 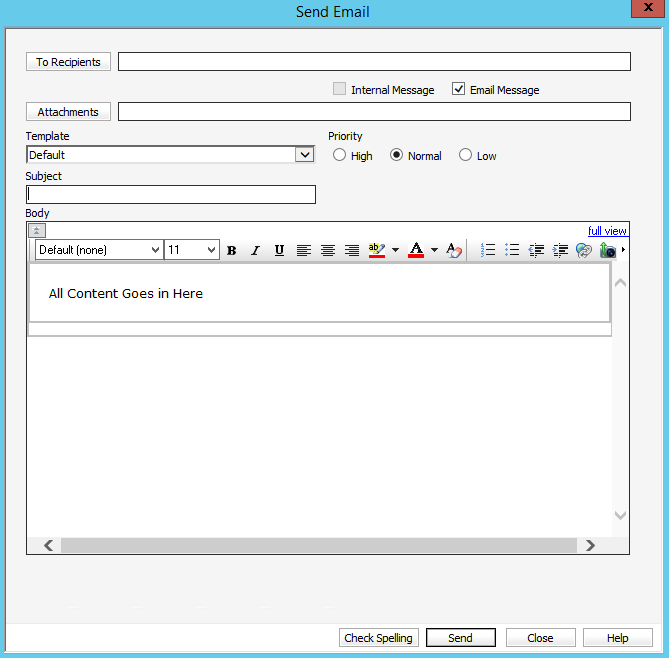 .
.
When selecting New > Message, you can specify whether you want to send an email, an internal message, or both.
Complete the details:
| To Recipients | Select the  button to display a search window to find recipients. button to display a search window to find recipients. |
| CC Recipients |
Select the button to display a search window to find recipients you want to be copied in on the email. |
| BCC Recipients |
Select the button to display a search window to find recipients you want to be blind copied in on the email. (They will not see the details of other recipients; nor will other recipients see their details.)
|
| Attachments | Select the  button to attach a file. Objects already attached to the entity are displayed in the top box. Select the ones you want to attach to the email and then select Add. To attach files that are not already listed, select Attach, locate and select the files. To attach files that are not already listed, and link them to the call/task/request/kb, select Upload, then locate and select the files. All files that you want to attach should appear in the Selected Objects box. button to attach a file. Objects already attached to the entity are displayed in the top box. Select the ones you want to attach to the email and then select Add. To attach files that are not already listed, select Attach, locate and select the files. To attach files that are not already listed, and link them to the call/task/request/kb, select Upload, then locate and select the files. All files that you want to attach should appear in the Selected Objects box. Then select OK |
| Template | Select the template you want to use for the message from the drop down list. If email templates are partitioned in your system, you can only select message templates defined in the partition of the entity from which you are sending the email. |
| Priority | Use the radio buttons to select the priority of the email. This has the same effect as setting the priority in Outlook, for example. |
| Security |
This is only visible if you have Security Profiles enabled in the system. |
| Self Service Portal |
Select this to make the email visible to Users viewing the call through the Self Service portal. |
| Subject | Type the subject of the email. There may already be text in this field, depending on how you accessed the window. You can update it if you wish. |
| Body | Complete the body of the message. This may already contain some information, depending on how you accessed the window. If you wish to add text and you have HTML formatting, you can format it and add tables, hyperlinks etc if you wish. When HTML content from a document or web page is pasted into an email, some information is removed from the content such as scripts, objects, applets, absolute positioning, or input elements. |
| Check Spelling | You may wish to check the spelling before sending the email. |
When you are happy with the email, select Send.
If you are creating the email from within a call or request, you can save it as a draft.
The address displayed in the From field of the email received by the recipient depends on the configurations set on the outgoing mail server used for sending the message:
- If Sent from Analyst is selected on the outgoing server settings, the From field will display your email address because you are the sender of the message.
- If Sent from Analyst is not selected on the outgoing server settings, the From field will display the address specified in the Outgoing Email ID field for that server.
To send an email, vFire Core uses the outgoing mail server assigned to the partition of the entity from which the message is being sent. If two or more active outgoing mail servers are assigned the same partition, vFire Core picks one.
Using Email Templates
The available templates are determined by the System Administrator in Email Settings.
Message templates can be configured using the Designer.
Templates for Automatically Sent Emails
If vFire Core is sending an automatic email, the message template depends on a number of factors:
- Whether your system has email partitions enabled in Partition Settings
- If emails and the entity from which the email is being sent are both partitioned, the email will use the template defined for the screen set and partition for that message type, as defined in Message Types.
- If there is no message template defined for that partition and screen set, the email will be sent using the templates defined for the parent screen set within that partition.
- If no message template is found for the parent screen set and partition, then the message template with the same screen set and selected for the Default partition will be used.
- If no message template is found for the message template with the same screen set defined for the Default partition, then the message template defined for the parent screen set for the Default partition will be used.
- If your system does not have email templates partitioned, or the entity from which the email is being sent is not partitioned, the email will be sent using the default message template. This is either the default selected message template, or the message template in the Default partition on the Message Type Map window for that message type.
Email Drafts
If you are sending an email from a call or request you can save, retrieve, update and delete drafts with attachments and recipients. When the draft email is sent, the original draft is deleted from the system. This is also true when a call is archived.
You can update and save the draft as many times as is needed before sending it, and you can attach as many email drafts as you wish to a call or request.
No action on the call or task is required in order to update an email draft. However, the call or request history records draft created, draft updated and draft deleted actions. Each of the history records contains information about the action performed, the person performing the action, the time the action was taken and the email subject. It should also be noted that cloning a call will not clone any linked draft emails.
A draft email can be viewed by any Analyst with access to the call or request. However, the fields in the draft email are generated based on the field security of the Analyst who created the draft. Furthermore, when an email draft is currently open with another Analyst it is flagged as “locked” in the database and no other Analyst can open it.
If there are drafts associated with a call or request, the Email option in the Email Explorer Option, under Communication in the Main tab, is orange and displays a small box beside it. This option returns to black once all drafts associated with the call or request are deleted or sent.
Saving an Email Draft
- Select the Save button in the Send Email dialog box. This saves a copy of the email as a draft along with any objects attached to it. If you are working on a draft, selecting Save will overwrite it.
- Select Close to close the dialog box. A warning message displays, informing you that changes maybe lost if you continue. However, if you have saved your email and made no further changes, it is safe to select Yes to continue.
Opening Saved Email Drafts
- With a call or request open, select Email from the Explorer pane. The Send Email dialog displays.
- At the top of the dialog, select the email draft you want to view (there may only be one email).
- Select Open. The email opens, and the content of the email displays in the lower portion of the Send Email dialog box and you can now edit it.
If there is more than one draft email saved against the call/request, a link displays in the bottom left corner of the dialog box indicating the number of emails attached, for example, Drafts (2). Selecting this link exits out of the current email and opens the Email Drafts window where you can select a draft email.
Deleting Saved Email Drafts
You can delete any number of email drafts attached to a call or request. To delete a saved email draft:
- With a call or request open, select Email from the Explorer pane. The Send Email dialog displays.
- At the top of the dialog box, select the email draft you want to delete (there can be multiple drafts)
- Select the Delete button. A warning message displays.
- Select the Yes button to confirm that you want to delete the draft email.
The call or request history records draft created, updated and deleted actions. Each of the history records contain information about the action performed, the person performing the action, the time the action was taken and the email subject.