Porting Configuration Data
Once an organization has configured and tested the settings on the source system (development environment), the settings can be ported to the target system (test environment) to test the import and settings, and then ported to the live environment, referred to as the master target system.
To export data from a source system and import it into a master/target system, take the following steps:
- Start the vFire Config Portability service.
- Open the Configuration Portability Settings window.
- Select the settings you want to export.
- Click the Export button to export the data from the source system into a file.
- Verify that the export has gone through as expected by reviewing the export log file.
- Click the link available in the log file to save the exported file.
- Log out of the source system.
- Create a backup of the target system or master target system.
- Log in to the target system or master target system.
- Open the Configuration Portability Settings window.
- Select the settings you want to import.
- Import the data into the target system using the exported file.
- Verify that the import has gone through as expected by reviewing the import log file.
The actual import settings are derived from the file and not the target setting. The settings here are only used to label the import with an easily identifiable name.
Exporting Configuration Settings
Before you start
You must have Configuration Portability selected in the Admin tab of your General Access security role.
Familiarize yourself with the Prerequisites and Considerations, and Best Practices.
The Configuration Portability Polling Service must be running on the vFire Core server.
If porting IPK/Workflow groups, ensure that the recipient analyst (in IPK Groups or Workflow Management Groups windows) and partition settings are the same on the source and target system.
For administrator values that can be flagged, for example the Request Completion Statuses, where a status can be set as the one to use for Closure, if different values are flagged in the source and target system, the value set in the target system is retained on import.
For porting knowledge screens, both knowledge entry types and knowledge base entry types are ported.
Selecting Settings to Export
- Log on to the vFire Core config port source system.
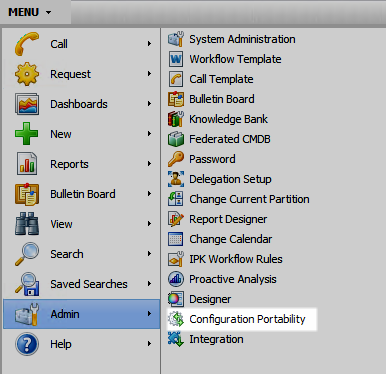
- Select
 and then Admin. From the submenu, select Configuration Portability
- The Configuration Portability Settings window is displayed. All defined configuration portability settings are listed in a browse table. If no settings have been added yet, only the standard entry All Options appears. This standard configuration portability setting is set up to export all configuration settings and cannot be edited or deleted.
- Select
 on the toolbar.
 - The Add New Configuration Settings window is displayed.
- Key a descriptive name for the settings (such as "Test environment Config Settings") into the Name field.
- Provide a description for the setting.
- Beneath the main heading, there is a number of tabs. Each tab corresponds to a heading on the System Administration Explorer (such as System, Security and Security Roles). In addition, Screens, Forms, and Messages Templates tabs are available to select the screens, forms and message templates you have created and/or configured using the Designer and wish to copy to another system. You can use the global Select All and Unselect All buttons to select or deselect all of the screen, forms and templates. You can then view specific tabs and select/deselect individual settings.
- Using the tabs, specify the new configuration settings. Selecting an entity (for example, Contract) selects all the screens, forms or message templates associated with it. If you want to export specific screens for a screen set, use the Screens – Individual tab. To select all settings under a particular tab, click Select All. To clear all settings under a particular tab, click Unselect All.
- Save the changes by selecting Save Configuration Settings to save now and export later, or Save and Export Configuration to save and continue with export.
Exporting Selected Settings
After you select and save the configuration settings you want to copy to another system, you can export them.
-
 To open the Export Configuration window if you previously saved configuration settings to export later
- Log on to the vFire Core config port source system.
- Select and then Admin. From the submenu, select Configuration Portability
- The Configuration Portability Settings window is displayed. All defined configuration portability settings are listed in a browse table.
- Select the row with the settings you want to export and select:
- Edit Configuration Settings to change the selections, and then select Save and Export Configuration to open the Export Configuration window; or
- Export Configuration to open the Export Configuration window
- Review the configuration settings you have selected on the Export Configuration window. This window displays two tabs that correspond to two different views:
- By Selection lists the settings grouped first by selection (Selected, Unselected) and then by system administration heading (System, Security, and so on).
- By Section lists the settings grouped first by system administration heading (System, Security, and so on) and then by selection (Selected, Unselected).
-
When you are ready to export the data, select Export Configuration. A dialog box opens prompting you to continue or abandon the export.
-
The Configuration Portability Process window is displayed while the export is in progress.
-
When the export is complete, the Configuration Portability Log window is displayed with a link to the exported settings file. It also lists details of the items that have been exported as well as any warning or error messages.
-
Select Cancel to close the log.
To expand a section and view the details of the settings you have selected or not selected, click the name of the heading or tab (for example, System tings you have selected or not selected, ). The options under the heading or tab are displayed.
To change any of the selections, select Edit Configuration Settings. The Edit Configuration Settings window appears.
You can save the log to an external file by selecting Save Log to File on the toolbar. The log can also be retrieved from the Configuration Portability Logs window, which you can access by selecting Export and Import Logs on the Explorer.
Importing Configuration Data
After you export the configuration data from the source system into an export file, you can import the file into the target or master target system.
Alemba recommends that you first import the configuration settings on a copy of the production database to verify that there are no errors with the export file or the import process.
Before any import, perform a backup of the target system. If the import does not complete as intended, you can roll back to the previous version of the database.
The import processes dependent data first. If, during the import process, the application encounters missing or inconsistent data, an error is written to the log file. Any log file errors should be investigated after the import to ensure the integrity of data in the target system.
The following types of errors are written to the import log file:
- Data errors such as data dependency errors, the existence of duplicate names, or the impossibility to find exact matches.
- System errors such as network failures or memory errors.
The log file also provides the list of values that were exported or imported. This enables you to compare what was exported and what was imported.
Before you start
You must have Configuration Portability selected in the Admin tab of your General Access security role.
Familiarize yourself with the Prerequisites and Considerations.
The Configuration Portability Polling Service must be running on the vFire Core server.
If porting IPK/Workflow groups, ensure that the recipient analyst (in IPK Groups or Workflow Management Groups windows) and partition settings are the same on the source and target system.
- Log on to the vFire Core config port target or master target system.
- Select Menu and then Admin. From the submenu, select Configuration Portability
- The Configuration Portability Settings window is displayed.
-
Select the default All Options row and then select Import Configuration. The Windows file browser dialog box is displayed.
-
Select the file to import. It is the export file you created previously (see Exporting Configuration Settings).
-
Select Open. The file browser dialog box closes and the Import Configuration window is displayed.
The Import Configuration window displays two tabs that correspond to two different views:
- By Selection lists the settings grouped first by selection (Selected Available, Selected unavailable, and so on) and then by system administration heading (System, Security, and so on).
- By Section lists the settings grouped first by system administration heading (System, Security, and so on) and then by selection (Selected Available, Selected Unavailable, and so on).
Configuration settings are grouped by selection (Selected, Unselected) and by availability (Available, Unavailable):
- Selected Available lists the selected settings that are available in the import file.
- Unselected Available lists the unselected settings that are available in the import file.
- Selected Unavailable lists the selected settings that are not available in the import file (because they were not exported to the file).
- Unselected Unavailable lists the unselected settings that are not available in the import file (because they were not exported to the file).
To expand a section and view the details of the set, click the name of the heading or tab. The options under the heading or tab are displayed.
- Review the configuration settings to be imported and, if needed, make any changes by selecting Edit Configuration Settings. The Edit Configuration Settings window is displayed. You can only change the available settings.
- Select Import Configuration. A message appears asking whether you wish to import the configuration. Select Yes to import the configuration data or No to cancel the import. The Configuration Portability Process window is displayed while the import is in progress.
- As soon as the import is complete, the Configuration Portability Log window is displayed. It lists the details of the items that have been imported as well as any warning or error messages.
- Click Cancel to close the log.
- The settings are saved in the database table SU_CONFIG_PORT_SETTINGS.
If there is a fatal error with the format of the file content, an error message is displayed.
You can save the log to an external file by selecting Save Log to File on the toolbar. The log can also be retrieved from the Configuration Portability Logs window, which you can access by selecting the Export and Import Logs explorer option.
The cache is cleared automatically.