Using Workflow Templates
Workflow templates are prebuilt Request Details windows with predefined field values. They include prebuilt workflows, featuring the tasks and approvals that will execute when a request is created from this template. These can be used to define and implement a range of repeatable defined processes, such as implementing Standard Changes, developing Service Level Requirements, or managing the production of complex documents such as Service Quality or Improvement Plans.
Each request for change created in vFire Core is based on a workflow template. To create a request without any details, simply create a workflow template without any information on it.
You can also create component workflows, which are workflows that are generic across a number of workflow templates.
Workflow templates can be used for:
- Requests logged by a user through the vFire Self Service portal. Any request submitted by a user from the Portal results in a request automatically logged in the main application based on the selected workflow template.
- Requests logged as a result of an event or Inbound Action.
Viewing Workflow Templates
Before you start
You must have Template Security selected in the Template tab of your Workflow Management security role.
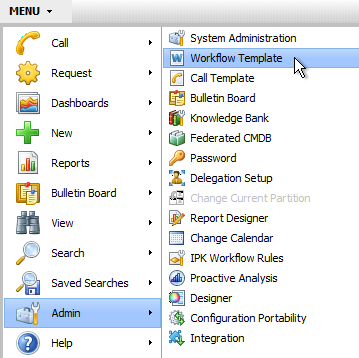
- Select
 and then Admin. From the submenu, select Workflow Template
  .
. - The Workflow Template Administration window appears
 . Use the filter parameters displayed.
 - From here you can create, update, delete or clone templates.
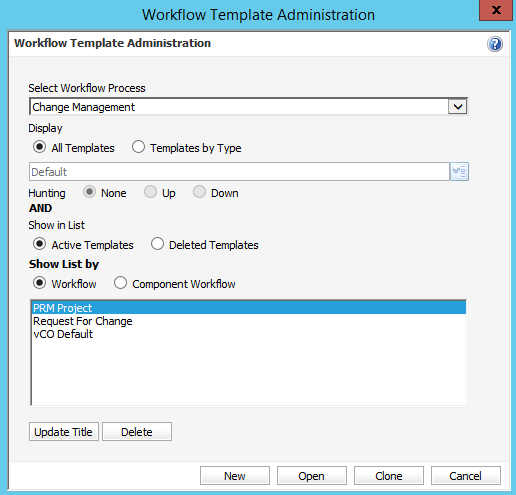
| Select Workflow Process | If you have several workflow processes, use the drop-down list to select the one you wish to view. | ||||||
| Display | Use the radio buttons to select the templates you want to display. All Templates lists all of the templates that have been created on your system. This is the default option. Templates by Type shows templates based on a selected request type and activates the list and radio buttons below. Use the button to display the drop-down list, and select the request type. Select the Hunting options:
|
||||||
| Show in List | To view current templates, select Active Templates. Select Deleted Templates to see deleted templates. You cannot create requests from deleted templates. |
||||||
| Show List by | Select Workflow to display the workflow templates, or Component Workflow to display the Component Workflow templates. |
Creating a Workflow Template
You can create a template for a specific workflow process with predefined tasks. The templates can be based on a request type and workflow process.
Depending upon your organization’s requirements, you can create a very detailed template with task dependencies and component workflows or just a simple template without any tasks, budgets and more. You can create a request without any details by creating a template and leaving the details blank. You can select extension fields defined through the Designer as an item for which to create a Condition or Action for a Conditional Branching Task within a Workflow Template.
Before you start
You must have Template Admin selected in the Requests tab of your Workflow Management security role.
Workflow templates can be created in one of the following two ways:
- creating it using the Workflow Template Administration window (as explained below)
- cloning it, and then updating the details
- by converting an existing request into a workflow template. To do this, you search for a saved request, and in the Request Search browse table, select the required request and then select
 from the toolbar.
- Select and then Admin. From the submenu, select Workflow Template . The Workflow Template Administration window appears.
- Select
 . The Workflow Templates or Workflow Components dialog box appears, depending on your selection in the previous step.
 - Type a relevant name for the workflow template or workflow component in the Workflow Template Name field.
- Select
 . The Workflow Template <name> Details window is displayed. This window is similar to the Request Details window.
 - You can now specify information on all fields as you would in a request, such as link CMDB items, create tasks, set action dates for the tasks, create task dependencies, specify task assignment, set agreements for the requests and tasks created from this template, and finally specify request assignment. You can link tasks to form a sequence or in parallel, simply by joining multiple tasks to a single predecessor. Your workflow template can be as detailed or as generic as you want it to be. You can even create a blank template for a workflow process. When you open a task in the dependency diagram on a template or a workflow component, the task opens in Review mode.
- Insert any workflow components required by displaying the dependency diagram, and then selecting the component workflow icon.
 All available workflow components are listed. Select the one you want to insert, and click OK.
 - To set the Self Service portal submission form to use when Users log requests using this workflow template through the vFire Self Service portal, select the Screen Set explorer option.
- After specifying the details, you can either save the template or assign it to an analyst or group.
| Select Workflow Process | If you have several workflow processes, use the drop-down list to select the one in which you wish to create the template. |
| Show in List | Select Active Templates. You cannot create requests from deleted templates. |
| Show List by | Select Workflow to create a workflow template, or Component Workflow to create a Component Workflow template. |
Any tasks you create for a workflow template will have an additional field on the Task Details window: Request Status on Completion, where you can update the request with the specified status once the current task is closed.
Some features are not available from the workflow template details, such as the ability to perform asset management transactions.
Cloning a Workflow Template
If you wish to create a template that is very similar to one that already exists, you can clone the existing template and then update it to make the necessary changes.
Before you start
You must have Template Admin selected in the Requests tab of your Workflow Management security role.
- View the templates.
- Select the template you want to clone from the list.
- Select
 .
. - In the Workflow Name dialog box, key in the name for the new template. You can also change the workflow process in this window.
- Select .
- The Workflow Template Details window is displayed. Make the necessary changes.
Assigning Workflow Templates
When assigning a task from a workflow template (or forwarding an inactive task), the request manager can specify multiple recipients for the task. When the task is activated as part of a request, vFire Core will automatically create a copy of the task and forward it to each recipient.
When specifying recipients, you can also select field values, such as Logging Analyst, rather than specifying particular analysts or groups.
Once a task assigned to multiple recipients is activated, cloned and assigned to each analyst, the original task from which the cloned tasks were created no longer exists. Therefore, you can only forward active tasks to single recipients. If additional people need to be assigned the task after it has already activated, request managers can manually add these tasks to the workflow.
If you have reached the Workflow Template Forward window by clicking the Assign button on a template, an Unassign button is displayed on the window after the request is assigned to an Analyst. To unassign a request, select the current managing analyst/group from the list and click Unassign to remove them as the default manager for this template.
Deleting a Workflow Template or Component Workflow
You can delete workflow templates or component workflows on the Workflow Template Administration window.
- View your templates or components by name or type.
- Select the workflow template or component.
- Select
 . A message is displayed prompting you to confirm the deletion.
 - Confirm the deletion.
If there are existing IPK Request Workflows that are using the template you are deleting, you will be prompted with a warning message. If you choose to continue deleting the template, any IPK Request Workflows using this template will then have an asterisk, ‘*’, succeeding its name.